Thursday, December 26, 2019

How to Install Base Cabinets: Get Your Shimmy On

How to install base cabinets

Precise measurement.  Efficient shimming.  Solid Fastening.  These are all keys to installing high-quality, pro-looking, cabinet installation in your home or office.

When installing base cabinets for the first time, don’t get intimidated.  Just remember what carpenters and builders have been saying forever:  If you can get that first piece right, then all the others will “fall” into place.

If you mess up that first step, though, look out.  You’ll run into head-ache and heart-ache for the rest of the project duration. If you can finish at all, that is.

This is as true to staining a cabinet as it is for hanging wallpaper.  Let’s get started.

Tools, Materials, and Steps To Install Base Cabinets:
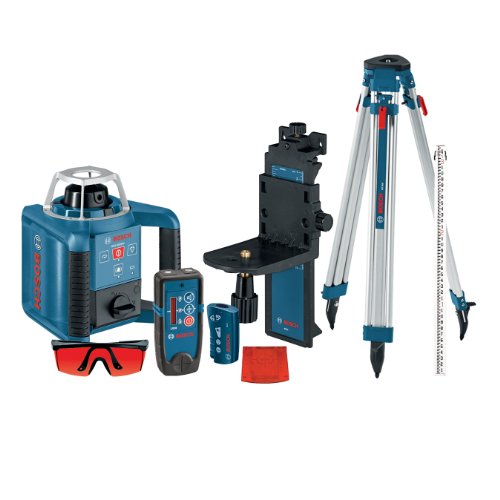
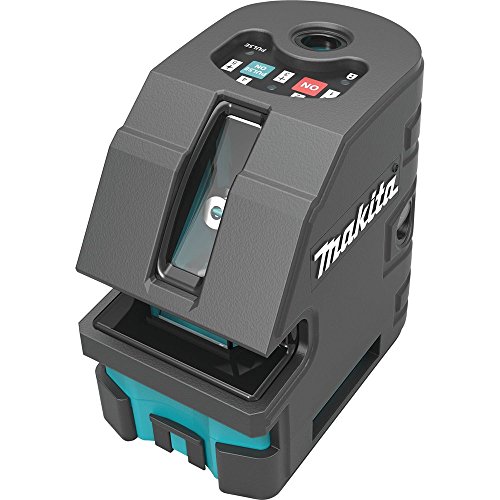
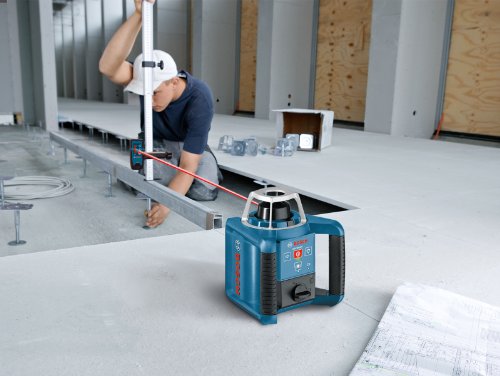
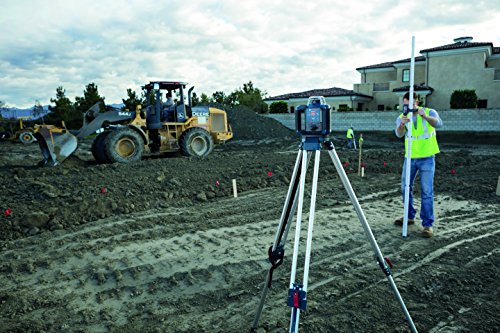
Step 1:  Locate the Highest Point on Floor where Cabinets are to be Installed

Remember up there ↑ where we said, the first step is the key?  Well, here it is.  If you have an uneven floor then you’ll have uneven base cabinets.

They’ll appear unlevel compared to the upper cabinets and it will bother you.  Plus, stuff will just roll everywhere.  Can you say “mess”?

how to install base cabinets

Find the highest point on the floor where you’ll be installing the cabinets by using your laser level.  This is where, later on in the process, you’ll be shimming cabinets to the height you just noted.

Step 2:  Draw a Level Line on the Wall at a height of 34.5 in. ABOVE the highest point on the floor

Note: The height accounts for a finished floor and a standard cabinet height (36 inches) that you’re installing.

Step 3: Mark Cabinet Locations

Denote the spots of the different cabinet units you’re installing by drawing vertical lines to the floor.  Then use a stud finder to locate the studs along your cabinet wall and mark those.

Note:  You’re going to need these marks, so make sure you mark them clearly and ABOVE the top line of the cabinet.

Step 4:  Starting with a Corner Unit if applicable.  If not, then choose either end

Set the base cabinets against the wall where you plan to install  Add shims beneath in order to make the top edge of the cabinet hits the first horizontal lines that you drew.  (Step 1)

If your wall isn’t at a 90-degree angle to the back end of the cabinets, then you may need to fill gaps with filler strips at the stud locations. These are thin pieces of wood material like this here.

At the end of this step, drill and countersink pilot holes and use the 2.5-inch screws to secure the cabinet (through the filler strip if used) to studs.

Step 5:  Continue to Cabinets


Now that the first cabinet is done you can move on with the adjacent cabinets in the same way.  Shimming when necessary

To make sure you get a flush fit between adjacent cabinets, use a clamp to join the two correctly.  Next, drill and countersink 4 pilot holes and attach screws.

Repeat steps 4 and 5 with remaining cabinets.

Step 6: Attach and Install Drawers and Doors on Base Cabinets

You’re there!  The fun part!  Now that you’ve installed the base cabinets, go ahead and finish the job off by securing doors and installing drawers onto tracks.  (Attach handles and knobs if not already secure)

Additional Considerations Needed When Installing Base Cabinets

  • Make sure walls are in good shape before starting and, if not, repair beforehand.  Also, finish all electrical and plumbing work in the room that your installing cabinets prior to base cabinet installation.
  • Pain the cabinets prior to installation so that you can still turn and move them around easily.
  • Install kitchen flooring (or bathroom flooring…wherever the cabinets are going) prior to installing cabinets.  This avoids the task of having to edge flooring around cabinets in the future.
  • Before installation, mark the locations of pipes and electrical boxes and then cut and cut holes for them.
  • When using filler strips, be prepared to do some fitting.  Walls are not always built perfectly and some won’t be plumb.  You can use a sander or grinder to cut down the size of the filler.

The post How to Install Base Cabinets: Get Your Shimmy On appeared first on Top Laser Levels.


source http://www.toplaserlevel.net/how-to-install-base-cabinets-get-your-shimmy-on/

Tuesday, December 24, 2019

Bosch Self-Leveling Rotary Laser Level Kit Review

Bottom Line Up Front: This is the ultimate in laser level kits.  The Bosch GRL300HVK is a versatile, accurate, durable, and warrantied precision tool.

Pros Cons
Lots of choices for rotation speed and scan angle variations. May have some items you are not familiar with if you’re a beginner
Remote Control Included
Durable
Kit case included for protection and organization
Stout battery life


Find Out More

Best Rotary Laser Level for Construction Bosch Self-Leveling Rotary Laser Level Kit (GRL300HVK)

Get the Best Price

Bosch has been leading the way in the scope of home and outdoor construction tools for a long time.  Their laser leveling tools and measurement technology is amongst the best in the business.

Bosch technology has among the most accurate and most durable laser levels on the market and it can be used for a variety of applications.  This full-kit, though, is what makes the self-leveling Bosch the best laser level for construction. Why?

Grade match is very important during construction projects. Laser levels with grade match have the capability to tilt and level with according to the grade that you want.

What is this Bosch Laser Level Best Used for?

Indoor use for things like installation of drop ceilings, chair rails, temporary walls, and trim work.  Just use the wall or ceiling mount and controls.

Used for outdoor work a great deal, but you’re most likely to need a laser detector so that the laser is easier to see.  This kit comes with a receiver and protective glasses.

This is a great kit for any of the following outdoor projects:  grading a yard or field, construction, and much more.  This kit comes with a grade rod.

Complete Bosch Laser Level Kit

There’s nothing that this kit isn’t read for.  A remote, wall mount and a very sturdy case make this the laser level that’s worth buying this time around.

Find Out More

2-Year Limited Warranty

FAQ

Q: Can you use this laser level outside?

Yes, the Bosch is made to be used primarily outside and in ambient light.

Q: Does it come with a carrying case?

Yes.

The post Bosch Self-Leveling Rotary Laser Level Kit Review appeared first on Top Laser Levels.


source http://www.toplaserlevel.net/bosch-self-leveling-rotary-laser-level-kit-review/

Monday, December 23, 2019

How to Build a Temporary Wall Easily

At some point, most of us do it. We start to get cramped, or “edgy” and bored with our space. At other times, our needs simply change. If you can’t go on with your space is laid out, building a temporary wall might be just your answer.

Renters have been leaning on temporary walls to meet their apartment or home space needs for decades. If you’re living in less than ideal conditions, need a private space, or want to create separate bedrooms for kids, a temp wall construction project is worth pursuing.

Since the temporary wall doesn’t tie into the home framing, it can be easily removed with minimum trouble or mess.

You don’t have to wait for a large savings account or a remortgage to add some office space, an extra nook, or an entire room to your home. Check out our simple tutorial and steps to build a temporary wall.

Disclaimer: Check local building codes before you start any building project at home. Pay particular attention to relevant stipulations. If you have any questions, contact the office in charge of your town’s building and municipal codes.

Tools and Materials Needed to Build a Temporary Wall

(Check on Amazon!)

Step 1: Put Sill Seal on All Surfaces the Temporary Wall Will Touch

If you’re new to DIY projects, or even if you’re seasoned craftsmen, you may not be familiar with sill seal.

It is a 1/4 inch thick foam that performs two vital functions for us, here:

First, it protects the floors, walls, and ceiling that already exists from getting damaged.

Secondly, (and more importantly) the sill seal will provide the pressure that is required to secure the temp wall where you position it.

Step 2: Cut two 2x4s to the Desired Length of the Temporary Wall

These are known as the “plates” and they will make up the top and bottom margins of your wall.

Step 3: Cut two MORE 2x4s so that they are 3 inches Shorter than Ceiling Height

Now, laser line measure from the floor to ceiling, making sure to measure twice (once for the left edge and again for the right edge of the wall) and in more than one area as heights can vary.

Subtract three inches for each measurement and cut a 2×4 to match each measured length. These are your end studs.

Step 4: Fit Vertical Studs Between the Top and Bottom Plates

Put the bottom plate over the sill seal that you’ve already on the floor. Get help from a friend, partner, or spouse to hold up the top plate against the ceiling and sill seal there.

Having an extra set of hands will allow you to wedge the studs into place.

(Don’t forget that you should have sill seal against any touching walls where you are placing the vertical beams.)

If either stud needs some tapping into place, then don’t hesitate to give it some taps with a hammer.

If the studs are too tall, just trim some length off with your circular saw. It’s better to go easy here and try and trim little by little.

Step 5: Nail/Screw the Outside Studs to the Top and Bottom Plates

So, you’ve got the wall perimeter down, now you just have to secure the end studs to the plates with nails or screws. It doesn’t matter which you’ve decided on but keep in mind that screws are easier to remove.

For more stability, for say a door or if you have kids or big dogs, it’s better and safer to secure the top plate to the closest ceiling joist.

Step 6: Place Additional Studs for Support and Attach Drywall

Install the remaining studs at normal intervals of between 16 and 24 inches. Also, if you’re trying for noise reduction in the wall, now is the time to add your insulation.

Lastly, hang the drywall panels on to the frame and studs with screws for later convenience.

Step 7: Finish the Wall You Want!

If you want or need just a basic, drywall finish then you’re done. Here’s where you can add primer, surface paint, baseboards, moldings, and of course, decorations.

You can easily make a temporary wall blend seamlessly in with your permanent walls. It just matters how much you want to add and, eventually, may need to take down.

The post How to Build a Temporary Wall Easily appeared first on Top Laser Levels.


source http://www.toplaserlevel.net/how-to-build-a-temporary-wall/

Sunday, December 22, 2019

Makita Self Leveling Cross Point Laser Level SK103PZ Review

The Makita SK103Z Cross Point Self Leveling Laser Level is an “all in one” Solution to all of your Early Construction and DIY projects.

Typically used in the early parts of construction projects, your measurement needs will vary.  Precision is NEVER not necessary, though, and that’s where the Makita comes in.

This tool combines all of the laser leveling chores you may need into this one product.  If it’s within 50 feet need for measurement, this tool is going to get it done for you.

You name the duty and the Makita Self Leveling Cross Laser can help out:  All needed reference lines are provided.

Disclaimer:  We’ve reviewed a number of other quality laser levels.


Makita SK103PZ Laser Level Features

  • Accuracy:
  • Horizontal Line:  +/- 1/8 inch at 30 feet
  • Vertical Line: +/- 1/16 inch at 30 feet
  • Points: +/- 1/8 inch at 30 feet
  • Fast Set-Up and Leveling:  Stability achieved in 3 seconds via enhanced self-leveling capability.
  • Built to Last: Built-in pendulum lock for laser diode protection when in transport or packed.
  • Flexible:  Laser line fan length goes well past 90° and provides 180° horizontal line as well as 120° vertical line.
  • Best in Class Visibility:  The laser is a Class II 635 nm in even moderate or light ambient environments.
  • Works on Uneven Surfaces:  Self-leveling capabilities that easily handle up to 4° of slope.
  • Easy to Operate in Many Modes:  5 mode functions to conserve power by only using necessary functions for certain operations.  Only a 2 button user interface!
  • Bracket:  Built-in bracket allows for easy attachment to a tripod.
  • Detection up to 200 feet when in Pulse Mode and battery up to 35 hours!

Get All the Info


Makita also has an option for an entire laser level kit with tripod. Check here to see if it is still available.

Drawbacks

The Makita only uses a red diode for a laser.  While red is the basic laser level color and it is pretty easy to see, during brighter times you’ll would usually opt for a green diode. The cost is kept down here by going red.  Read more about Red vs. Green lasers.

FAQ

What Is Pulse Mode in Makita Laser Levels?

Pulse mode can extend runtime up to 35 hours. It’s like a cheap laser show at the Science Museum…but very underwhelming.  This is best used in darker situations as it drops the overall brightness but keeps your level going longer.

Is the Makita SK103PZ Durable?

The entire laser level is protected by a rubber outer coating that provides protection from some impacts, but you’ll want to check the calibration if it gets knocked off a sawhorse and hits the floor.

Will Water and Dust Affect the Laser Level?

The Makita laser level has an IP54 rating which means it’s moderately protected from dust and water.

  Get All the Info


The post Makita Self Leveling Cross Point Laser Level SK103PZ Review appeared first on Top Laser Levels.


source http://www.toplaserlevel.net/makita-self-leveling-cross-point-laser-level-sk103pz-review/

Thursday, December 12, 2019

Why Are Green Laser Levels More Expensive than Red?

In case you didn’t notice as you browse our laser level recommendations, the green lasers are more expensive than the red ones. Up to 20% more in most cases. But why are green laser levels more expensive? 

Let’s take a closer look.

It wasn’t long ago when red laser levels ruled the roost.  It didn’t matter what you were doing; home DIY, construction, electrical work, HVAC and more.  The red laser was the be all of the laser measuring world.

Green laser level or Red?

Now, more and more people are switching or choosing green laser levels.  First things first, though: Accuracy is a NON-FACTOR here.  There is NO difference in accuracy potential or red or green.

Battery Life and Power

Green laser levels are somewhat easier to see in daylight than their red counterparts.  Even then, though, only marginally.

Green lasers DO boast better visibility and even more range BUT that also means that they eat through batteries like Cookie Monster through a Keebler cache!

And what happens when the battery drains quickly? You got it!  Those “easier to see beams” start to weaken and make it difficult to spot in the daytime.

This is a push.

Visibility

Green beam levels are SUPERIOR for doing jobs that are under ambient light.  Think pavement, drywall, plumbing, and construction.

The green diode puts out greater power and makes the beam more visible even in light. It seems to have a sharper, crisper line and point.

Laser wavelength and power determine it’s visibility.

As long as your batteries stay strong, the closer the wavelength is to 555nm than the easier to see.  Green lasers sit at between 560nm to 520nm. This makes them 4 TIMES brighter than traditional red.

What is do nm and mW mean in Lasers?

The “nm” stand for nanometer which is a measure of length.  For lasers, mW describes the power of the laser.  nM refers to the wavelength of the laser.  Some wavelengths are difficult or impossible to see to the naked eye.  This makes green lasers superior.

Visibility still depends on:

  • Ambient light
  • Surface type
  • Battery charge

visible laser light spectrum

Range

This is sort of variable depending on not only the quality of the laser level but also factors such as refraction, polarization, scattering, reflection, dispersion, and wavelength.

However, in my opinion as a layman, I can pretty much conclude and tell you that green lasers are easier to view from a longer range than red.

Indoors, red lasers will typically have a range of 20 to 30 feet while a green laser can reach 50 to 60 feet.  (DeWalt)

But there’s a hack you can use to make your red laser reach as far and work as well for you as a green laser level: Laser Detectors.

And…getting a laser detector for your red laser level will be less expensive than just buying a green laser.

When it comes to outdoors, the green laser level is an easy winner at up to 60ft or beyond visibility.

Price

Finally, the big question:  What’s the difference in price?  Well, I’ll tell you, I’ve never met a green laser level of a certain quality that is cheaper than a red one of the same quality.

The average cost increase for green over red laser levels is about 20% more.  Why? It’s just more expensive in regards to parts for green lasers.

Bottom Line:  Green Lasers are Better BUT more Expensive than Red Lasers.

Which color laser level you choose is going to be based upon your certain situation.  I hope we’ve helped you figure out why green laser levels are more expensive than the red ones.

If you’re mostly working in smaller, inside spaces or if budget is a concern then you’ll want to opt for red laser levels over the green.


The post Why Are Green Laser Levels More Expensive than Red? appeared first on Top Laser Levels.


source http://www.toplaserlevel.net/why-are-green-laser-levels-more-expensive-than-red/